
What are Deep Links?
Deep links are URLs that launch a specific page or content within a mobile app, rather than just opening the app's home screen. They significantly improve user experience by taking users directly to relevant content, boosting engagement and retention.
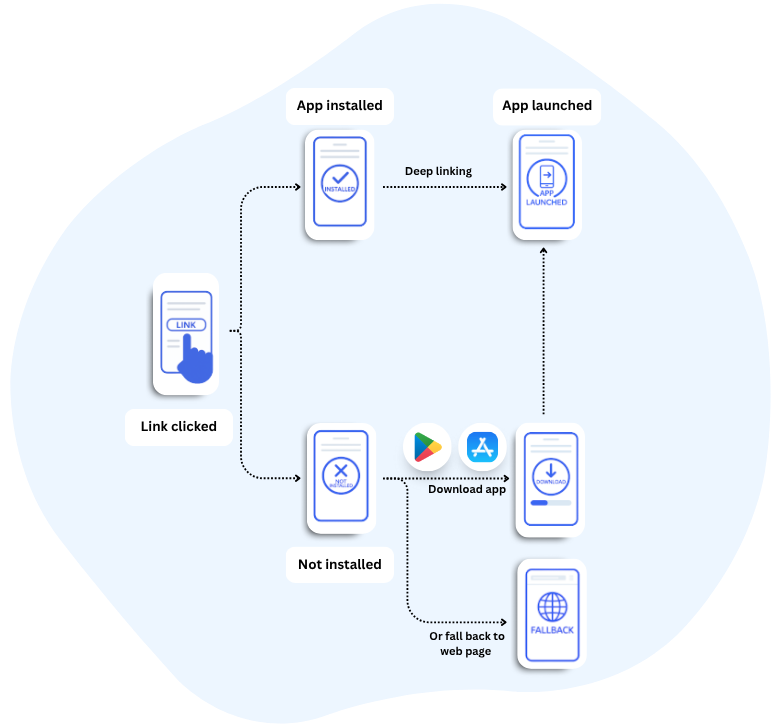
Deep Linking Decision Flow
With Deep Links
Users tap a link and land directly on the specific product page, article, or content they're looking for.
Without Deep Links
Users tap a link, app opens to home screen, then they must navigate to find the content.
Main Deep Link Features
Deep links open your app if it's installed (with a website fallback otherwise), use verified links that bypass the app selection dialog, and ensure the same URL works seamlessly across web and mobile.
Quick Examples
Jump straight into implementation with these practical examples for both iOS and Android platforms.
iOS Universal Links
URL Pattern
https://yourapp.com/product/123 Swift Handler
handleUniversalLink(url: incomingURL) Android App Links
URL Pattern
https://yourapp.com/product/123 Intent Filter
android:autoVerify="true" Flutter
URL Pattern
https://yourapp.com/product/123 GoRouter Route
GoRoute(path: "/product/:id", builder: ...) iOS Universal Links
Overview
Enable Associated Domains in your Apple Developer account, create an AASA file, host it at /.well-known/, and handle incoming links in your AppDelegate.
iOS Universal Links use an Apple App Site Association (AASA) file to securely associate URLs with your app. When users tap a Universal Link, iOS checks if your app is installed and opens it directly to the specific content.
Implementation Steps
1. Configure App ID in Apple Developer Portal
Before enabling Associated Domains in Xcode, you must first configure your App ID in the Apple Developer Portal with the Associated Domains capability.
App ID Requirements
Use an explicit App ID (e.g., com.example.myapp) — wildcard App IDs (e.g., com.example.*) are not supported for Associated Domains. The Associated Domains capability must be enabled in the App ID configuration.
Select your App ID or create a new one with an explicit Bundle ID (no wildcards)
In the Capabilities section, enable Associated Domains
Save the configuration and regenerate your provisioning profiles
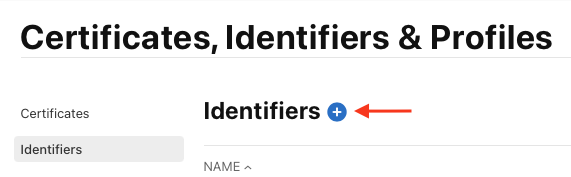
Step 1.1: Navigate to Identifiers in Developer Portal
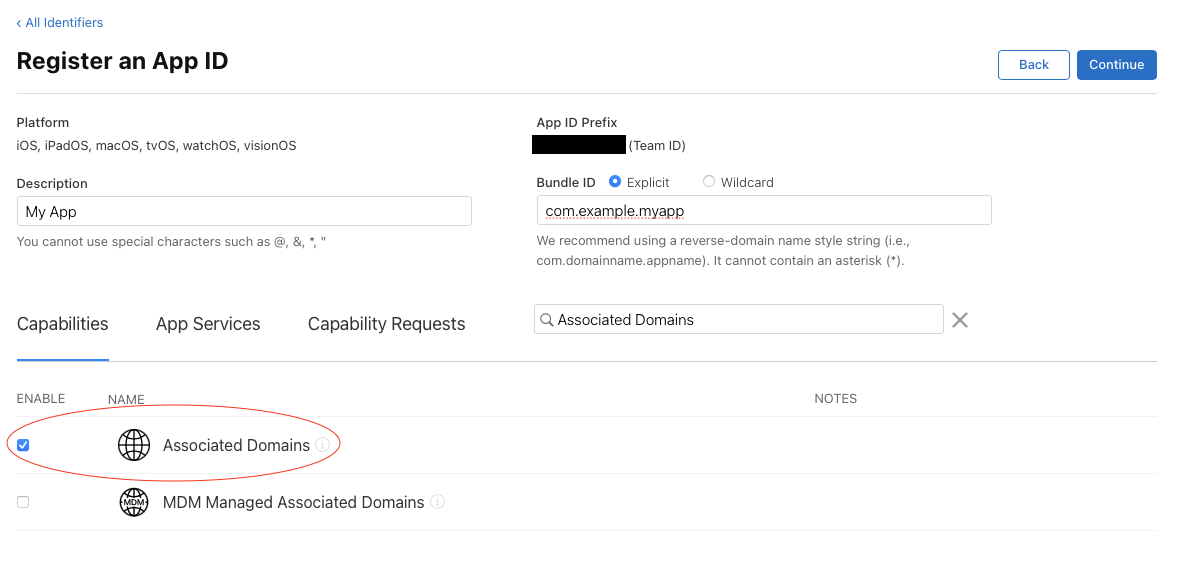
Step 1.2: Register App ID with Associated Domains capability
Important
After enabling Associated Domains for your App ID, you must regenerate and download your provisioning profiles in Xcode or the Developer Portal.
2. Enable Associated Domains in Xcode
In Xcode, go to your app target → Signing & Capabilities → Add Capability → Associated Domains.
applinks:yourdomain.com 
Step 2.1: Click Signing & Capabilities
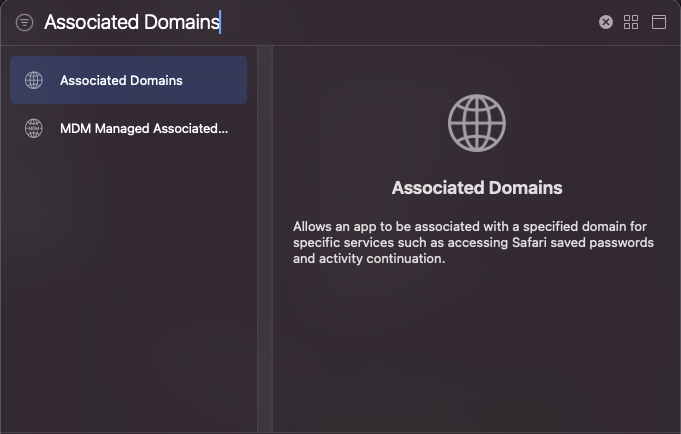
Step 2.2: Add Capability → Associated Domains

Step 2.3: Configure Associated Domains
3. Create AASA File
apple-app-site-association file (no extension) with your app details.
The
TEAMID
and
BUNDLEID
values can be found in your Apple Developer Console open_in_new.
{
  "applinks": {
    "apps": [],
    "details": [
      {
        "appID": "<TEAMID>.<BUNDLEID>",
        "paths": [
          "/products/*",
          "/help",
          "/profile/*",
          "/orders/*"
        ]
      }
    ]
  }
}
How to configure the "paths"
The paths array specifies which parts of your website should be handled by your app as Universal Links. The system matches incoming URL paths against this list from top to bottom.
The asterisk (*) matches any sequence of characters — for example, "/products/*" will match /products/123 and /products/new-item-name. A question mark (?) matches any single character, so "/item/?" would match /item/a but not /item/ab.
Paths without wildcards, like "/help", match that exact URL path only. You can exclude paths by prepending "NOT " (with a space) — for instance, ["NOT /products/admin/*", "/products/*"] handles all product URLs except the admin section. The exclusion must come before the broader inclusion.
Important
Path matching is case-sensitive, and it only applies to the path component of the URL, not the query parameters or fragments.
4. Handle Links in App
Implement the Universal Link handler in your AppDelegate
func application(_ application: UIApplication,
                continue userActivity: NSUserActivity,
                restorationHandler: @escaping ([UIUserActivityRestoring]?) -> Void) -> Bool {

    guard userActivity.activityType == NSUserActivityTypeBrowsingWeb,
          let incomingURL = userActivity.webpageURL
    else {
        return false
    }

    // Parse the URL and navigate to appropriate screen
    handleUniversalLink(url: incomingURL)
    return true
}

private func handleUniversalLink(url: URL) {
    let path = url.path

    if path.hasPrefix("/products/") {
        let productId = path.replacingOccurrences(of: "/products/", with: "")
        // Navigate to product detail screen
        navigateToProduct(id: productId)
    } else if path == "/profile" {
        // Navigate to profile screen
        navigateToProfile()
    }
}Android App Links
Overview
Add intent filters to your manifest, create an assetlinks.json verification file, host it at /.well-known/, and handle incoming deep links in your Activity.
Android App Links use the Digital Asset Links protocol to verify that your app can handle specific URLs. They open directly in your app without showing the app selection dialog.
Implementation Steps
1. Update AndroidManifest.xml
Add intent filters with autoVerify="true" to your activity
<activity android:name=".MainActivity">
    <intent-filter android:autoVerify="true">
        <action android:name="android.intent.action.VIEW" />
        <category android:name="android.intent.category.DEFAULT" />
        <category android:name="android.intent.category.BROWSABLE" />
        <data android:scheme="https"
              android:host="yourdomain.com"
              android:pathPrefix="/products" />
    </intent-filter>

    <intent-filter android:autoVerify="true">
        <action android:name="android.intent.action.VIEW" />
        <category android:name="android.intent.category.DEFAULT" />
        <category android:name="android.intent.category.BROWSABLE" />
        <data android:scheme="https"
              android:host="yourdomain.com"
              android:pathPrefix="/profile" />
    </intent-filter>
</activity>
Example Android Manifest
2. Create Digital Asset Links File
Create assetlinks.json file with your app's package name and certificate fingerprint
[{
  "relation": ["delegate_permission/common.handle_all_urls"],
  "target": {
    "namespace": "android_app",
    "package_name": "com.example.myapp",
    "sha256_cert_fingerprints": [
      "12:34:56:78:90:AB:CD:EF:12:34:56:78:90:AB:CD:EF:12:34:56:78:90:AB:CD:EF:12:34:56:78:90:AB:CD:EF"
    ]
  }
}]
3. Handle Links in Activity
Process incoming links in your Activity
@Override
protected void onCreate(Bundle savedInstanceState) {
    super.onCreate(savedInstanceState);
    setContentView(R.layout.activity_main);

    handleIntent(getIntent());
}

@Override
protected void onNewIntent(Intent intent) {
    super.onNewIntent(intent);
    handleIntent(intent);
}

private void handleIntent(Intent intent) {
    String action = intent.getAction();
    Uri data = intent.getData();

    if (Intent.ACTION_VIEW.equals(action) && data != null) {
        String path = data.getPath();

        if (path.startsWith("/products/")) {
            String productId = path.substring(10); // Remove "/products/"
            openProductDetail(productId);
        } else if (path.equals("/profile")) {
            openProfile();
        }
    }
}
Verification Tips
- Test with
adb shell am start -W -a android.intent.action.VIEW -d "https://yourdomain.com/products/123" com.example.myapp - Check status
adb shell dumpsys package domain-preferred-apps
Flutter Deep Links (GoRouter)
Overview
Configure native App Links and Universal Links for each platform, add deep-linkable routes with go_router, parse path and query parameters (e.g. product IDs), and navigate users to the correct screen on both cold and warm starts.
In Flutter, deep links are ultimately handled by your navigation setup.
Once the native platform is configured to open your app for
https://yourdomain.com/... URLs, a router such as
go_router can map the incoming URL path to a Flutter route
(for example, /products/123) and build the correct screen.
Implementation Steps
1. Add go_router
Add go_router to your Flutter project:
dependencies:
  flutter:
    sdk: flutter
  go_router: ^17.0.1
Note
go_router is maintained by the
Flutter team and supports deep linking out of the box when used
with MaterialApp.router.
2. Define deep-linkable routes
Create route patterns that match your URLs. For example, this route will handle /products/123 and extract the ID.
import 'package:flutter/material.dart';
import 'package:go_router/go_router.dart';
void main() => runApp(const MyApp());
final GoRouter router = GoRouter(
routes: <RouteBase>[
GoRoute(
path: '/',
builder: (context, state) => const HomeScreen(),
),
GoRoute(
path: '/products/:id',
builder: (context, state) {
final productId = state.pathParameters['id']!;
final ref = state.uri.queryParameters['ref']; // optional
return ProductScreen(productId: productId, ref: ref);
},
),
GoRoute(
path: '/profile',
builder: (context, state) => const ProfileScreen(),
),
],
);
class MyApp extends StatelessWidget {
const MyApp({super.key});
Widget build(BuildContext context) {
return MaterialApp.router(routerConfig: router);
}
}
// Example screens (replace with your own widgets)
class HomeScreen extends StatelessWidget {
const HomeScreen({super.key});
Widget build(BuildContext context) {
return const Scaffold(body: Center(child: Text('Home')));
}
}
class ProductScreen extends StatelessWidget {
const ProductScreen({super.key, required this.productId, this.ref});
final String productId;
final String? ref;
Widget build(BuildContext context) {
return Scaffold(
appBar: AppBar(title: const Text('Product')),
body: Center(
child: Text('Product ID: $productId\nref: $ref'),
),
);
}
}
class ProfileScreen extends StatelessWidget {
const ProfileScreen({super.key});
Widget build(BuildContext context) {
return const Scaffold(body: Center(child: Text('Profile')));
}
}3. (Optional) Add redirects (e.g. login gate)
If some routes require authentication, you can redirect users and preserve the original deep link so you can send them back after login.
final ValueNotifier<bool> isLoggedIn = ValueNotifier<bool>(false);

final GoRouter router = GoRouter(
  refreshListenable: isLoggedIn,
  redirect: (context, state) {
    final goingToProfile = state.uri.path == '/profile';
    if (!isLoggedIn.value && goingToProfile) {
      final from = Uri.encodeComponent(state.uri.toString());
      return '/login?from=$from';
    }
    return null;
  },
  routes: <RouteBase>[
    GoRoute(
      path: '/login',
      builder: (context, state) => const LoginScreen(),
    ),
    // ...other routes like /profile, /products/:id, etc.
  ],
);
4. Test deep links
These commands help you launch your app with a URL during development:
- Android (ADB):
adb shell am start -W -a android.intent.action.VIEW -d "https://yourdomain.com/products/123" com.example.myapp - iOS Simulator:
xcrun simctl openurl booted
                                    "https://yourdomain.com/products/123"
Note
Launch commands confirm your app can receive the URL, but they don't fully validate the website association. For full verification, tap the link from a browser, Notes, email, etc., after completing the Android/iOS setup.
Compatibility note
If you use a third-party deep link plugin (e.g. app_links) you may need to opt out of Flutter's default deep link handler on Android/iOS. If you're only using go_router + native App Links/Universal Links, you can typically keep the defaults.
Hosting Deep Link Files
Both iOS and Android require hosting the apple-app-site-association and assetlinks.json files on your web server. These files establish the trust relationship between your domain and mobile app.
iOS Requirements
- File:
apple-app-site-association - Location:
/.well-known/ - Content-Type:
application/json - Max Size: 128 KB
android Android Requirements
- File:
assetlinks.json - Location:
/.well-known/ - Content-Type:
application/json - Max Size: No limit
Critical Requirements
All files must be served over HTTPS with a valid SSL certificate and be directly accessible — no 301/302 redirects, no authentication, and no geo-restrictions. Each domain and subdomain needs its own copy of the verification file.
File Locations
iOS Universal Links
https://yourdomain.com/.well-known/apple-app-site-association (preferred)
https://yourdomain.com/apple-app-site-association (legacy fallback)
Android App Links
https://yourdomain.com/.well-known/assetlinks.json
Testing Your Files
iOS
Use Apple's validator or curl to test
curl -I https://yourdomain.com/.well-known/apple-app-site-association Android
Use Google's Digital Asset Links API
https://digitalassetlinks.googleapis.com/v1/statements:list?source.web.site=https://yourdomain.com NGINX Configuration
If you are using NGINX as your web server, you need to configure it to correctly serve the deep link verification files and handle fallback routes. Below is the recommended NGINX configuration for deep linking.
Server Block Configuration
Add the following location blocks to your NGINX server configuration
location /.well-known/ {
    autoindex off;

    root /usr/share/nginx/html/deep-linking-guide/;
    default_type application/json;
}

location = /enrollment {
    root /usr/share/nginx/html/deep-linking-guide/;
    try_files /app-fallback.html =404;
    default_type text/html;
}

location / {
    autoindex off;

    root /usr/share/nginx/html/deep-linking-guide/;
}
Configuration Breakdown
-
/.well-known/— Serves theapple-app-site-associationandassetlinks.jsonfiles withapplication/jsoncontent type. Directory listing is disabled for security. -
/enrollment— Handles the enrollment deep link path by serving the fallback HTML page when the app is not installed. Usestry_filesto serveapp-fallback.htmlor return a 404 error. -
/— Serves all other static files from the deep linking guide directory with directory listing disabled.
Important Notes
Make sure the root path matches the actual location of your deep linking files on the server. The default_type application/json directive is critical for the /.well-known/ location, as both iOS and Android require the correct content type. Ensure HTTPS is configured in your server block, since both platforms require SSL for deep link verification. For any additional deep link paths your app handles, add new location blocks following the /enrollment pattern.
Web Fallback Handling
Not all users will have your app installed. Providing a seamless web fallback ensures a great experience for everyone, whether they have your app or not.
Fallback Strategies
App Installed
Deep link opens directly in app
App Not Installed
Fallback to web version
Smart Banner
Show app install prompt
Example Fallback Page
Create a fallback HTML page that provides app download links:
<!DOCTYPE html>
<html lang="en">
<head>
    <meta charset="UTF-8">
    <meta name="viewport" content="width=device-width, initial-scale=1.0">
    <title>Get Our App</title>
    <style>
        body {
            font-family: -apple-system, BlinkMacSystemFont, 'Segoe UI', Roboto, sans-serif;
            max-width: 400px;
            margin: 50px auto;
            padding: 20px;
            text-align: center;
            background: #f8f9fa;
        }
        .app-icon {
            width: 80px;
            height: 80px;
            border-radius: 16px;
            margin-bottom: 20px;
            background: #007AFF;
            display: flex;
            align-items: center;
            justify-content: center;
            color: white;
            font-size: 32px;
            margin: 0 auto 20px;
        }
        .download-buttons {
            display: flex;
            justify-content: center;
            align-items: center;
            gap: 10px;
            flex-wrap: nowrap;
        }
        .download-btn {
            display: inline-block;
            padding: 12px 24px;
            background: #007AFF;
            color: white;
            text-decoration: none;
            border-radius: 8px;
            font-weight: 500;
            transition: opacity 0.2s;
        }
        .download-btn:hover {
            opacity: 0.8;
        }
        .download-btn.android {
            background: #34A853;
        }
        .card {
            background: white;
            border-radius: 16px;
            padding: 32px;
            box-shadow: 0 4px 12px rgba(0,0,0,0.1);
        }
    </style>
</head>
<body>
    <div class="card">
        <div class="app-icon">📱</div>
        <h1>Get Our App</h1>
        <p>For the best experience, download our mobile app:</p>

        <div class="download-buttons">
            <a href="https://apps.apple.com/app/idXXXXXXXX" aria-label="Download on the App Store" class="hover:scale-105 transition-all duration-200 transform">
                <img src="https://www.svgrepo.com/show/303128/download-on-the-app-store-apple-logo.svg"
                    alt="Download on the App Store" width="180" />
            </a>

            <a href="https://play.google.com/store/apps/details?id=com.example.myapp" aria-label="Get it on Google Play" class="hover:scale-105 transition-all duration-200 transform">
                <img src="https://www.svgrepo.com/show/303139/google-play-badge-logo.svg"
                    alt="Get it on Google Play" width="180" />
            </a>
        </div>

        <p><small>Or <a href="/web-version" class="hover:text-asee-blue hover:scale-105 transition-all duration-200 transform">continue in browser</a></small></p>
    </div>
</body>
</html>
Fallback HTML Template
Additional Tips
When a user clicks a link, try opening your app first — if it doesn't launch after 1–2 seconds, redirect them to the appropriate app store page based on their device OS. If a user dismisses the app prompt or chooses "Continue in browser," remember their preference and don't repeat the prompt. Consider using native iOS and Android smart banners for seamless app promotion.
Smart Banners Explained
When a user visits your website on a mobile device without your app installed, smart banners provide a native prompt to encourage app installation. They enhance user experience by seamlessly integrating app promotion within the browsing context.
Safari automatically detects if your app is available in the App Store and shows a native banner, while Chrome displays "Add to Home Screen" or app install prompts based on your web app manifest. These banners are styled by the browser to match the operating system's design language, only appear when the app isn't already installed, and won't reappear for the session once dismissed by the user.
iOS Smart App Banner Implementation
<meta
 name="My App"
 content="app-id=123456789, app-argument=myurl://path"
>
-
app-id
Your App Store ID (found in App Store Connect) -
app-argument
Deep link URL to open specific content
Android Web App Manifest
Add the manifest link to your HTML head:
<link
 rel="manifest"
 href="/manifest.json"
>
Example manifest.json file:
{
  "name": "My App",
  "short_name": "MyApp",
  "start_url": "/",
  "display": "standalone",
  "theme_color": "#007AFF",
  "background_color": "#ffffff",
  "icons": [
    {
      "src": "/icon-192.png",
      "sizes": "192x192",
      "type": "image/png"
    },
    {
      "src": "/icon-512.png",
      "sizes": "512x512",
      "type": "image/png"
    }
  ],
  "related_applications": [
    {
      "platform": "play",
      "url": "https://play.google.com/store/apps/details?id=com.example.myapp",
      "id": "com.example.myapp"
    }
  ],
  "prefer_related_applications": true
}-
related_applications
with Play Store URL and package ID -
prefer_related_applications: true
to prioritize native app - Valid app icons (192px and 512px recommended)
- App name and theme colors for consistent branding
Browser Limitations
Smart banners only work in Safari (iOS) and Chrome (Android). Other browsers like Firefox, Opera, or in-app browsers require custom fallback solutions using JavaScript detection and manual store links.
download Download All Templates
Get all the template files you need to implement deep linking
Best Practices & Tips
Follow these essential guidelines to ensure your deep linking implementation is secure, performant, and provides an excellent user experience.

Security
Always serve association files over HTTPS and validate all incoming URLs before handling them in your app. Implement certificate pinning for additional transport security, and establish a regular rotation schedule for your signing certificates.

Performance
Keep your association files small and fast-loading, and distribute them through a CDN for reliable global access. Set appropriate caching headers to balance freshness with performance, and monitor file accessibility to catch outages early.

User Experience
Provide meaningful fallback pages for users without the app installed, and test your deep links thoroughly across devices and OS versions. Handle edge cases gracefully — such as expired links or missing content — and monitor your analytics to catch errors and understand usage patterns.

Development
Use custom URL schemes during development for faster iteration, and implement comprehensive logging to trace deep link resolution. Build automated tests that cover your link patterns, and document your URL structure clearly so the team can maintain it confidently.